5 Design Frameworks For Running Killer Product Ideation Workshops
Table of Contents
- Your Workshop Checklist
- Setting the Stage for a Successful Workshop
- 5 Design Frameworks for Your PM Toolkit
“Structured innovation.” That’s the phrase that I used while describing my strictly time-boxed workshop to a UX design colleague ahead of our company’s 2022 product offsite. Our goal was to shape the firm’s 2024 product vision and we’d all been given an area to focus on. I had chosen a series of design frameworks to accomplish this goal.
Was I worried that I’d leave little time for creative thinking, my colleague asked. I wasn’t, I responded, because a design thinking workshop without structure or clearly defined goals is just an interesting (and forgettable) conversation.
This can be a somewhat controversial view for those who see structure as the enemy of creativity. I’ve come to find the opposite to be true.
As a product manager and former journalist, I’ve observed that we are inclined to structure our thinking using a variety of subconscious tools and frameworks. For example, nearly two-thirds of professionals make a list to organize the incomplete tasks swirling around in their heads.
Research has also shown the benefits of journaling for boosting creativity and clarifying our thoughts. Heck, when I was still working as a journalist almost ten years ago, I’d spend more time on the outline of a story than the story itself.
Design thinking methodologies are popular tools used by tech startups and giants alike for the purpose of product innovation. However, they are merely formalized versions of the thought structures we turn to every day.
In a workshop environment, you probably only have one day—maybe less—with your group. By failing to provide those frameworks when time is limited, participants are then forced to spend time choosing which framework to use on their own.
My goal during any product ideation workshop is to give participants the freedom to think clearly and creatively by removing from them the burden of structuring their own creativity.
The particular workshop I referenced at the beginning of this article was highly successful, yielding more than 50 new customer use cases, a rough UI design, an overarching product direction for 2024. The activities outlined below can help you achieve the same—even with a strict time budget.
By Failing To Prepare, You Are Preparing To Fail…
Before we dive in, here’s a checklist to make sure you’ve set yourself up for a successful workshop before you even begin.
Your Workshop Checklist
- Participants with diverse skill sets: To ensure a wide range of perspectives, select your team members from a range of disciplines. including product management, product development, UX design, marketing, and customer success.
- Preparation materials and itinerary published in advance: You may choose to compile user personas, workflow diagrams, previously conducted user research, and any reading materials from the web that may help the group ideate around your customers and your market.
- 3-5 activities with clear instructions: This is what you’ve come to read about! Ensure your activities are published ahead of time with clear instructions for each.
- Materials for each activity (and enough for everyone): Product and design work doesn’t have to live inside your head. To make things more fun, don’t forget your props! Ahead of an in-person workshop, I often purchase sticky notes, whiteboard markers, dot stickers, and more. Note that if your team is remote, having the right materials translates into having the right idea management software.
- Time for breaks: This is especially true if you’re running a full-day or multi-day workshop.
- Clear goals and deliverables: Identify goals ahead of time to ensure all participants have the chance to orient themselves toward your objectives. If your goal is to define a new product, feature, user interface, or product objective, state it clearly. Furthermore, outline the scope of the workshop and any assumptions you’ve made ahead of time.

Setting the stage for a successful workshop
After weeks (maybe months?) of preparation, the moment has finally arrived. It’s workshop day!
After delivering a rousing introduction, handing out printed copies of the pre-reading material, putting phones away and on silent (notifications, unlike time-boxing, are the death of creativity!) and reviewing the design processes you’ll be using, it’s time to wade into your first activity.
Just like a good book, every workshop needs a beginning, middle and end. I prefer to break activities down into three categories: Problem Discovery, Problem Analysis and Problem Solving.
5 Design Frameworks For Your PM Toolkit
Part 1: Problem Discovery
Problem Discovery activities focus mainly on the preparation materials you provided ahead of time. These activities should give all participants an equal understanding of the customer or stakeholder you’re aiming to service with the outcome of the workshop.
Workflows-to-Opportunities
Analyze a pre-defined customer workflow for friction points. Friction points become opportunities for new products and features.
A workflow analysis is a UX framework that allows participants to get familiar with the frustrations, pain points, and needs of your end user. This exercise gets right to the heart of our most important goal as product managers—building the right product.
How do we know that we’re building the right product for the right market? How do we avoid the often-tempting pitfall of building a solution for a problem that doesn’t exist?
By becoming acutely familiar with the day-to-day, moment-to-moment user experience, we can identify and tackle the most impactful work.
A workflow-to-opportunities analysis starts with a simple workflow diagram. If you haven’t used one before, feel free to take a look at the diagram below. Many popular product design tools such as Miro, Mural, and Figma come with pre-defined templates to help you create beautiful workflow diagrams.
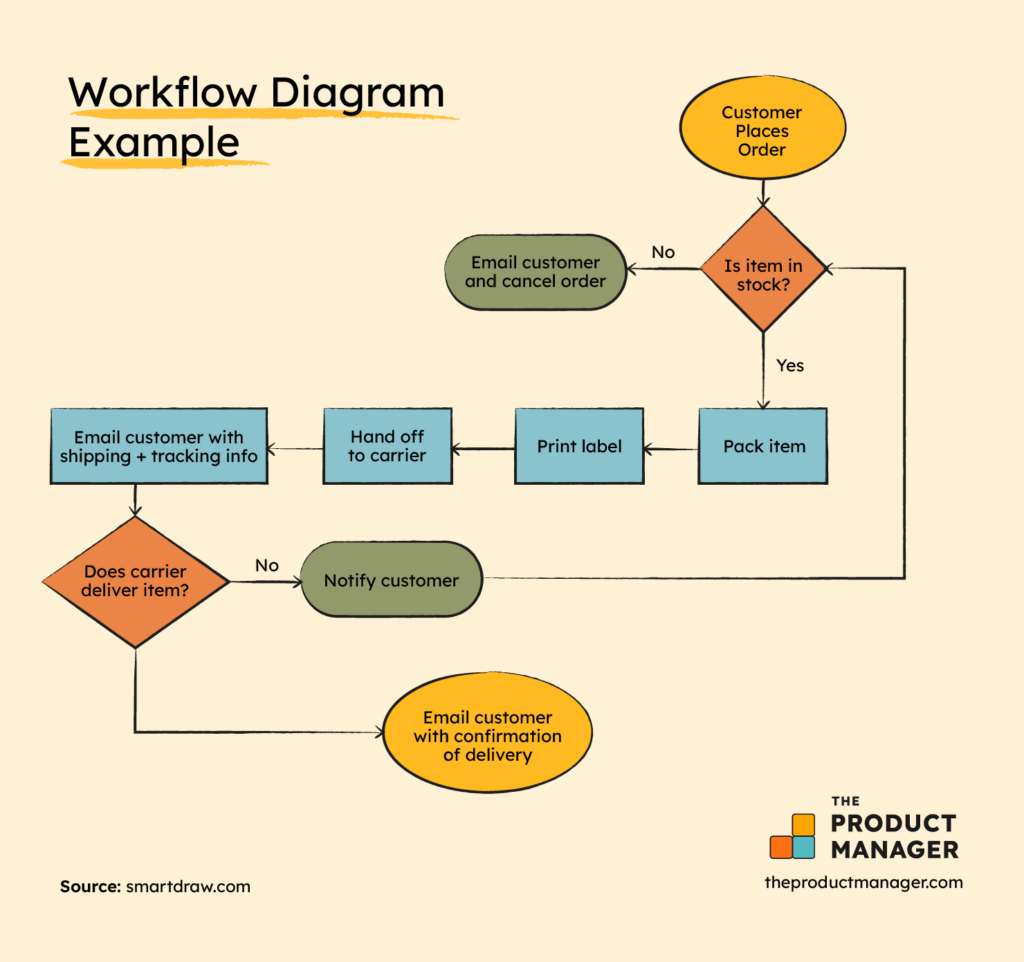
These diagrams should ideally be sent out in your pre-reading package before the workshop to give participants time to get acquainted with them.
My preference is to do this activity with printouts of each workflow and pens or markers. However, this can easily be adapted to digital interfaces if you don’t have the ability to get together with your team in-person.
Once everyone has either physical or digital access to a workflow diagram, the next step is to allocate a 10-15 minute timeline for participants to read through the workflows and document anything that represents an opportunity for our product; friction points, pain points, major needs, points of satisfaction, etc.
By the end of the exercise, group members will likely find themselves with heightened intuition into the problems that need solving for your target customer.
Part 2: Problem Analysis
Problem Analysis activities dive deeper into the customer analysis completed in Part 1 by identifying the most important, urgent, and relevant problems to be solved. With a never-ending selection of problems to choose from, this step is critical in giving the product manager a holistic view of the value of solving each one—and for whom.
Now that feedback and/or pain points have been identified, it’s time to quantify their urgency to your customers or stakeholders.
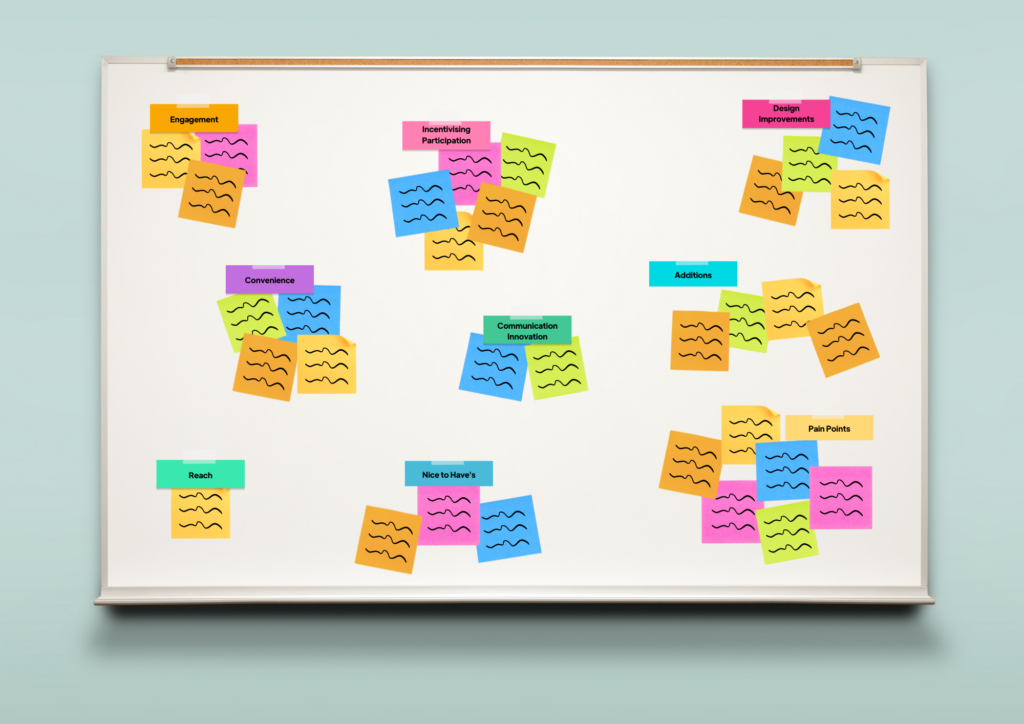
Affinity Mapping
Categorize customer pain points or feedback into larger themes to better understand which customer needs are most pressing.
Affinity Mapping is a design framework that involves categorizing items based on similar themes.
If pairing an affinity mapping with the workflow-to-opportunities activity described above, simply have the group convert the notes they previously scribbled or typed onto the workflow into bullet points to be categorized. The pain points, needs, etc. can also be pulled from previously-collected customer feedback.
Before setting the group loose, be sure to convey that the objective is to create a visual representation of the most impactful problems we can solve for the user. I find it useful to pre-define a handful of “umbrella categories” before the group gets sorting, but this is optional depending on available time and the volume of bullets you want to categorize. Some popular umbrella categories include customer pain points, needs and even jobs-to-be-done.
Hold on, what are jobs-to-be-done?
The “jobs-to-be-done” (aka “JTBD”) design framework is a popular tool often used by product design teams and product development teams to identify the most important goals of their end-users. They do this by looking at user needs not as a static set of binary desires, but as purposeful actions all pointing to a handful of measurable goals.
There are lots of examples of JTBD being used effectively by product teams for ideation purposes, but the framework requires structure to maximize its effectiveness.
Depending on the fidelity of the feedback, pain points, and customer needs identified in Part 1 of the workshop, the facilitator may choose to have them identify the user’s “jobs-to-be-done” as an umbrella category during affinity mapping exercise.
Once the larger umbrella categories have been determined, the group can be unleashed to begin categorizing the bullets into sub-categories that fall into each umbrella. This is often the most fun and interactive portion of the workshop. While the facilitator should aim to guide this discussion, it’s best to let the group go where their imaginations take them.
Your hierarchy should look something like this:
This activity can easily be done virtually using Miro or Mural as well.
Once the bullets have been sorted into their umbrella categories and sub-categories, the workshop facilitator then has the option to focus on one umbrella category or run the affinity mapping exercise within each category depending on the goals of the workshop, the scope, and the size of the group.
The categories and subcategories with the most sticky notes underneath them represent the most urgent and pressing points to address for the end user, which will then move on to the next phase: Problem Solving.
Check out the video below for an example of a completed affinity mapping exercise.

Part 3: Problem Solving:
Problem Solving activities bring the theoretical UX design work to its practical conclusion. As product managers, we’re wired to be solution-oriented, but it can be difficult to identify the point when enough theoretical analysis has been completed to make decisions.
The fact is, you could analyze a problem forever. To avoid this, part of our role is to make decisions with incomplete information. We will always have the opportunity to iterate on these ideas by running usability tests or adjusting the user experience later.
The activities I explore in this section help workshop participants turn their deep understanding of the end user into a prioritized list of product development work.
“How-might-we” Statements
This activity be performed at the beginning or end of a workshop and is more effective in a group setting. Usually starts a "how might we” or problem statement and allows participants to develop out-of-the box ideas that lead to solutions.
There are many different ways to conduct a successful “how-might-we” activity, which can either be completed as part of a larger workshop or on its own as a simple ideation exercise.
Within the workshop format described above, the group would work together to create “how-might-we” statements from the pain points, needs, or jobs-to-be-done identified in the Affinity Mapping exercise.
For example...
Let’s say it was discovered that a customer’s primary “job-to-be-done” is sharing documentation across their organization for the purposes of real-time collaboration, but that permissions and tracking changes were pain points preventing them from accomplishing this goal. In this scenario, a how-might-we statement might sound something like this:
“How might we allow our users to collaborate with their co-workers with ease while ensuring that the right people have access to the appropriate documentation at the right time?”
After narrowing down top “how-might-we” statements, it’s time to take the leap into feature ideation. It might seem like a stretch, but at this point, participants are so ensconced in the user experience that they’ve likely got some ideas to share already.
There are many ways to help the group take this leap. Two methods that I often rely on are scenario writing and sketching.
Scenario writing works by having each workshop participant imagine how the end-user might come to interact with their application, and ultimately their experience using it. Each participant will then write a short story detailing their vision for how the product or feature satisfies the “how-might-we” statement for the user.
Sketching also gives the group an opportunity to be creative by allowing them to imagine and sketch out the workflow or user interface of a feature that satisfies the “how-might-we” statement. You might choose to use digital tools like Balsamiq, or other UX tools for the sketching exercise. These sketches often wind up being the beginnings of a user-centered design.

Depending on the size of the group, you can also opt to offer both options and allow them to choose which they feel more comfortable doing. In both of these exercises, the group should be given about 10-20 minutes of quiet time to individually consider the discussions of the day and decide how to best address the “how-might-we” statement.
This should be the least structured part of your workshop. The group members now have the insight to address the objectives on their own.
Remember to save all the outputs from this and the previous exercises to refer back to. Even ideas that don’t make the cut this time might turn into interesting design projects in the future.
Impact vs. Effort:
A tool for prioritizing work according to effort and impact. Once feature ideas are defined, place them on the Impact vs. Effort matrix.
The Impact vs. Effort matrix is a popular tool among product managers as well as my favourite way to end a workshop.
With the amazing ideas that undoubtedly came out of the day’s discussions, it’s time to evaluate each top-ranking idea for the impact it may have on the customer versus the effort it might take to make each idea a reality.
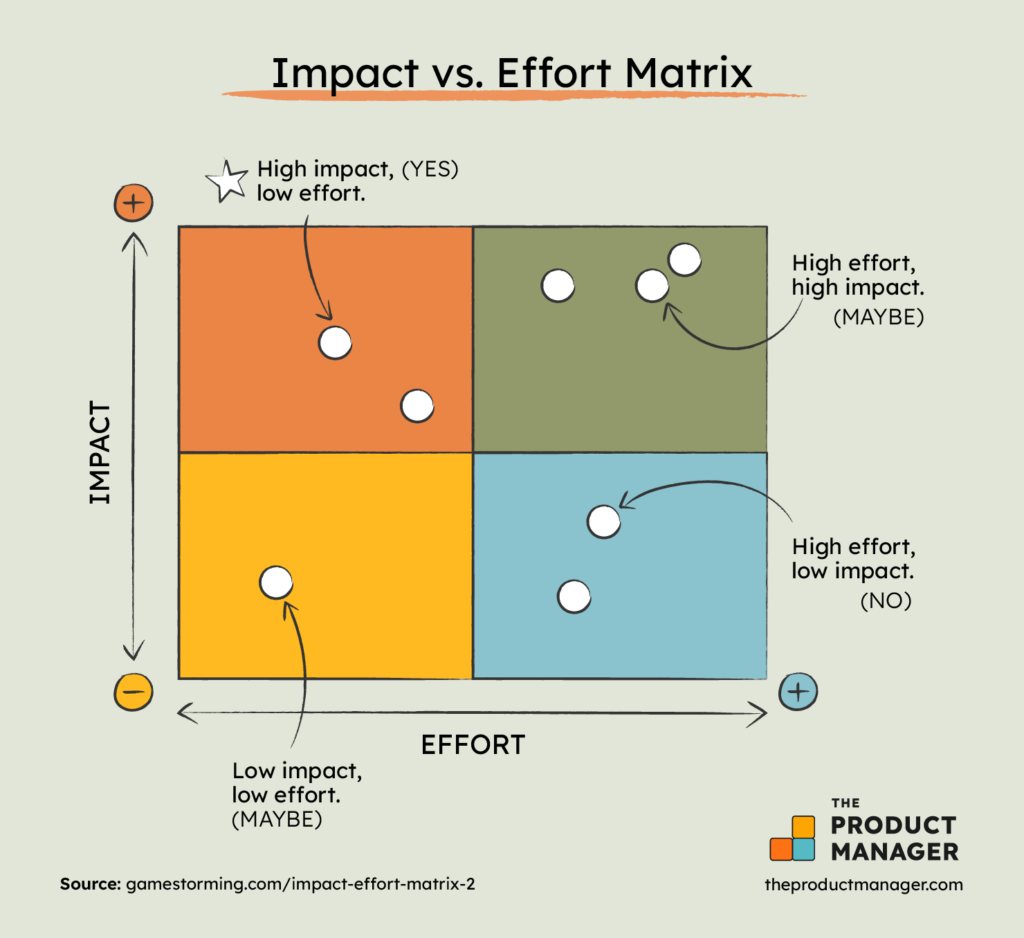
Together, the group should discuss each idea and align on where it should be placed on the matrix. Doing this exercise as a group is critical because it tends to balance out any bias individual participants might have regarding the impact of their own ideas.
By the end of this exercise, it should be easy to discern which items qualify as “quick wins” versus which high-impact items might require more time and resources. Even more importantly, it should be clear which items are too low-impact and too high-effort to bother doing at all.
Catch Lightning In A Bottle!
In a perfect world, product managers would always have the opportunity to run a lengthy design workshop containing all of these activities before drafting up their PRDs. Unfortunately, that is rarely the case.
The benefit of the activities outlined above is that they are highly adaptable. They can be run as individual activities or coupled together. They can also be run with virtual groups, with groups of many sizes, asynchronously, or over many days.
Regardless of what your time or your colleagues’ time will allow, regularly engaging in creative exercises is a necessary part of a product manager’s job.
While it may not feel like it on the busiest of days, our primary role is not simply to be backlog managers. What sets us apart in our industry is our ability to channel our creativity—and the creativity of others— into high quality product ideas.
With only so many hours in a day, the Structured Innovation approach to design thinking workshops simply increases your chances of catching lightning in a bottle.
If you enjoyed this article, be sure to check out our newsletter for the industry-leading product management content!